

In this post I am going to show how we can test the public API of a microservice that is secured with Auth0. It is important that these tests are fully automated and that at the same time no secrets leak out into code or source control.
The microservice will be written using .NET Core 3.1, but the same principles apply if we test any other microservice written in a different language such as Java, Python or Node JS and that is also protected by Auth0.
I am going to present 2 ways of testing the API:
- Integration tests also written in .NET Core 3.1
- Outside-in or blackbox tests written in Jasmine and Node JS
The code to accompanying this post can be found on GitHub.
Creating a sample Microservice
First, let’s create a .NET microservice that will be our sample. We will use .NET Core version 3.1. Please make sure you have this version installed by executing dotnet --version in a terminal window. At the time of writing the exact version is 3.1.100. If you do have an older version or no version at all installed, then you can get the newest bits here: https://dotnet.microsoft.com/download
Scaffolding the microservice
We will use the Web API template to create the service.
- Create a folder for the solution called
glossaryand navigate to it. For simplicity let’s create the folder in your home directory:$ mkdir -p ~/glossary && cd ~/glossary - Create a new project called api using the Web API template:
$ dotnet new webapi --output api - Run the new microservice:
$ dotnet run api - Open a new terminal windows and make sure it works as expected using the following command:
$ curl --insecure https://localhost:5001/weatherforecast
The output of the above command should be a JSON formatted array of temperature readings for the next days. Notice that the parameter--insecureis used since we are using a self signed certificate for SSL/TLS in development. It avoids thatcurlis showing an error - Stop the microservice by pressing
CTRL-cin the terminal window
Now we are ready to add some logic, in our case we want to implement a simple CRUD controller that allows us to manage some glossary.
Adding a CRUD Controller
With the controller we can list all glossary items, display a specific item, add new, modify and delete existing glossary items.
We are going to use Visual Studio Code (short: VS Code) as our code editor since it is free and runs on all platforms, Linux, Windows and Mac equally well. If you have not yet installed VS Code then get it from here: https://code.visualstudio.com/download
- Open the solution using VS Code by executing the following command from within the solution folder:
$ code . - In the
apiproject locate and delete the fileControllers/WeatherForecastController.cs. We don’t need this class added by the Web API template - Instead add a file
Controllers/GlossaryController.csto theapiproject - Add the following code to this new file; it should be pretty self explaining:
- In the root folder to the
apiproject add a fileGlossaryItem.cswith this content:
Now we are ready to run and test the new API.
Manually testing the CRUD Controller
It is always a good thing to quickly test the code we have just implemented. For quick and dirty manual tests curl is an excellent tool with low ceremony.
- Run the microservice to test the new functionality:
$ dotnet run api - Open a new terminal window and test the 5 new endpoints by e.g. using the following commands:
- List all glossary items:
$ curl --insecure https://localhost:5001/api/glossary - Show the item with term
jwt:$ curl --insecure https://localhost:5001/api/glossary/jwt - Add a new glossary item:
$ curl --insecure -X POST \--header 'Content-Type: application/json' \--data '{"term": "MFA", "definition": "Multi factor authentication"}' \https://localhost:5001/api/glossary - Update an existing glossary item:
$ curl --insecure -X PUT \--header 'Content-Type: application/json' \--data '{"term": "MFA", "definition": "Multi factor authentication (changed)"}' \https://localhost:5001/api/glossary - Delete an existing glossary item:
$ curl --insecure -X DELETE \https://localhost:5001/api/glossary/jwt
- List all glossary items:
- When done testing, press
CTRL-cto stop the microservice
So far so good, we have a fully working microservice. Next, let’s write some integration tests that test the new endpoints.
Adding Integration Tests
No code should go into production if it has not been validated by automated tests! Thus, let’s write some integration tests for the glossary controller.
We are going to write our integration tests in .NET Core 3.1 too and are going to use xUnit as our test framework.
- Open a terminal window and navigate to the solution folder:
$ cd ~/glossary - Create a test project using the
xunittemplate:$ dotnet new xunit --output tests - We will be using the Microsoft TestServer in our project thus add the respective NuGet package:
$ dotnet add tests package Microsoft.AspNetCore.Mvc.Testing - Add a reference to the
apiproject, containing the code we want to test, to this newtestsproject:$ dotnet add tests reference api - If you have not done so before, open the solution in VS Code:
$ code . - Locate the class
UnitTest1.csin the tests project and open it - Change the code in this file to look as follows:
- In your terminal window and from within the solution folder run the tests with the following command:
$ dotnet test tests
It should succeed and the above command should produce output similar to this: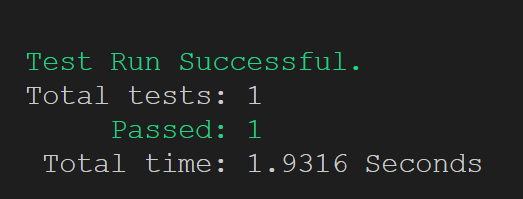

Having the scaffolding for integration tests and a first test working, we can now proceed to write some outside-in or black box tests.
Adding Outside-in Tests
Sometimes it’s most useful to write black box tests against the microservice. These are tests that only validate the correctness of the public API of a microservice and have no knowledge about the inner workings of the same. In our case we want to implement the tests using Jasmine and Node JS. Let’s start:
- Create a sub-folder outside-in-tests in your solution folder and navigate to it:
$ mkdir -p ~/glossary/outside-in-tests && cd ~/glossary/outside-in-tests - Initialize this folder as a Node JS project with:
$ npm init
You can accept most or all of the default values suggested by this command - Add jasmine to this project:
$ npm install jasmine --save - Initialize this project with jasmine:
$ node_modules/jasmine/bin/jasmine.js init
This will add a Jasmine configuration file calledspec/support/jasmine.jsonto the project - Add the axios library to this project:
$ npm install axios --save - Open the file package.json and change the test scripts block to look like this:
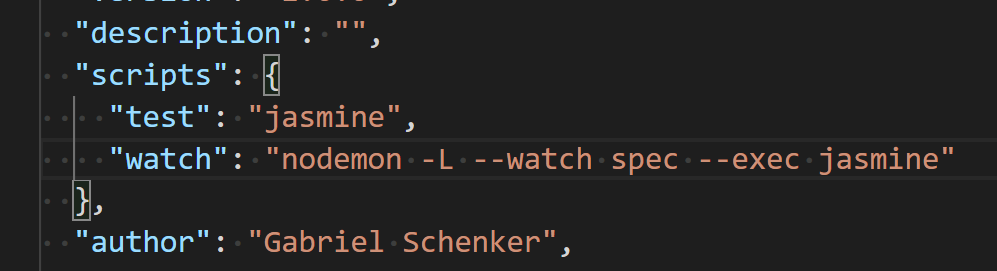

That is, we have atestand awatchscript. The latter we will be using a bit later - Add a file called
glossary-spec.jsto thespecfolder of the project - To this file add the following code:
Note lines 2, 3 and 8 in the code above. We need those to make the tests work over HTTPS while using a self-signed developer certificate.
You can now run this against a running instance of the microservice. Follow these instructions to do so:
- Make sure to run the microservice by executing the following command from within the solution folder:
$ dotnet run api - In another terminal window navigate to the
outside-in-testsfolder and run the tests:$ cd ~/glossary/outside-in-tests
$ npm test
The output of the test run should look similar to this: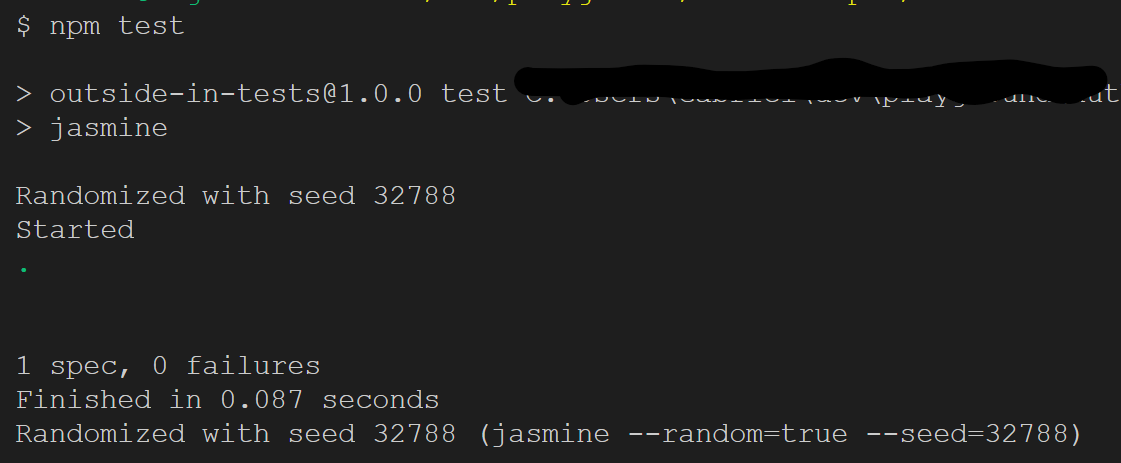

So, we have authored a sample microservice, tested it manually and we also have written integration tests and outside-in tests for the microservice. It is now time to secure the API of the microservice.
Securing the API
Now that we have a working API and some integration and outside-in tests for it, we want to secure our API using Auth0.
Registering the API with Auth0
Before we proceed, we need to register our API with Auth0.
If you do not yet have an account on Auth0 then you can create a free one here: https://auth0.com/signup
- Login to Auth0
- On the Dashboard navigate to the APIs tab
- Click the button + CREATE API
- On the form enter
- a friendly Name for the API, e.g. Glossary API
- an Identifier, in our case select https://glossary.acme.com
- Leave the Signing Algorithm on its default RS256
- Click the button Create when done. The details page of your new API will be displayed
- Select the Test tab on the API details page and note down the values for
- identifier (or audience):
http://glossary.acme.com - client_id:
<your client id> - client_secret:
<your client secret> - authority:
https://<tenant>.auth0.com
Where<tenant>is the name with which you authenticated yourself to Auth0
- identifier (or audience):
That’s all what’s needed for the moment from Auth0.
Configuring the microservice for Authentication by Auth0
Now that we have registered our API with Auth0 we can configure our microservice for authentication by Auth0.
- In your terminal window, from within the solution folder run the following command to add the Microsoft JWT package helping us to deal with the authorization tokens provided by Auth0:
$ dotnet add api package Microsoft.AspNetCore.Authentication.JwtBearer - Open the class
Startup.csof theapiproject - Add the following using statement to the top of the file:
using Microsoft.AspNetCore.Authentication.JwtBearer; - To the
ConfigureServicesmethod add the following code snippet: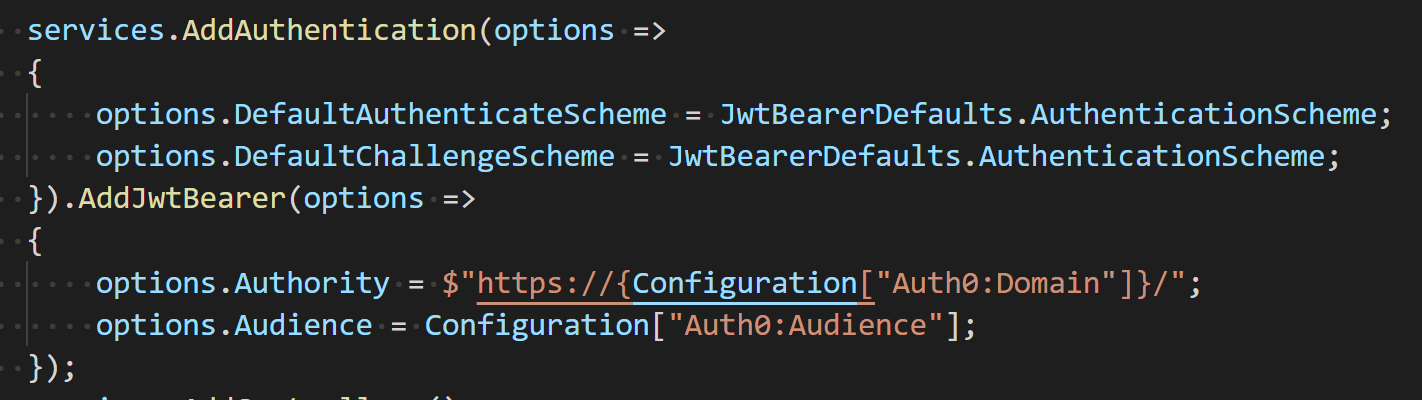

Note how we are using values from the configuration file, e.g.Configuration["Auth0:Domain"] - To the
appsettings.configfile add the following snippet, which contains the values for ourDomainandAudience:

Make sure to add you ownDomain, wich is in the form of<tenant>.auth0.com - To the
Configuremethod of theStartupclass add the following line to enable authentication:app.UseAuthentication();
Make sure this statement is placed right before the already presentapp.UseAuthorization() - Now let’s protect the POST, PUT and DELETE endpoints of the Glossary controller. To each of the respective methods add an
[Authorize]attribute. E.g. the DELETE method would look like this: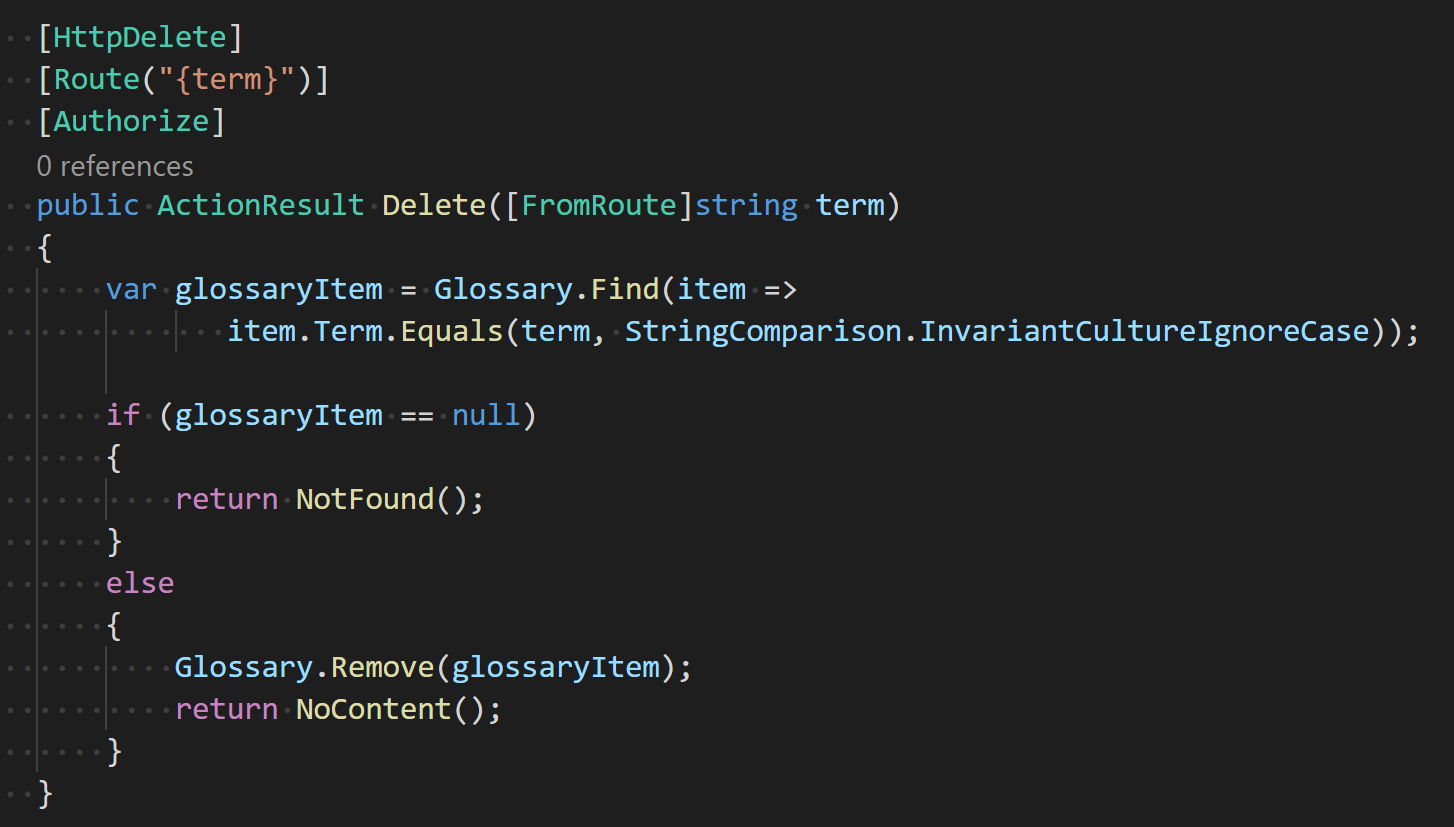

- Run the microservice:
$ dotnet run api
We are now ready to test the secured API. Since requests to the secured endpoints require us to provide a valid Authorization header, using curl becomes a bit more cumbersome. I thus recommend to use a REST client such as Postman from now on.
Testing the secured API with Postman
We will be using Postman for all the manual testing of the secured API.
- First we need a valid token from Auth0. We can use the admin API of Auth0 to get a test token. In Postman create an new request
- select type
POST - use the URL
https://<tenant>.auth0.com/oauth/token - add a header
Content-Type: application/json - add a body like in the image below:
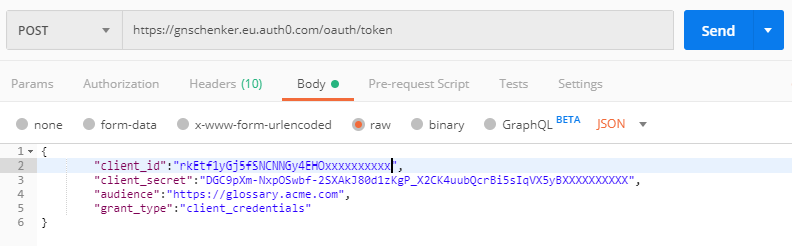

make sure you put in your own values forclient_idandclient_secret - and then click the button Send
- select type
- The response body will contain the
access_tokentogether with its expiry period and token type. Copy the token value: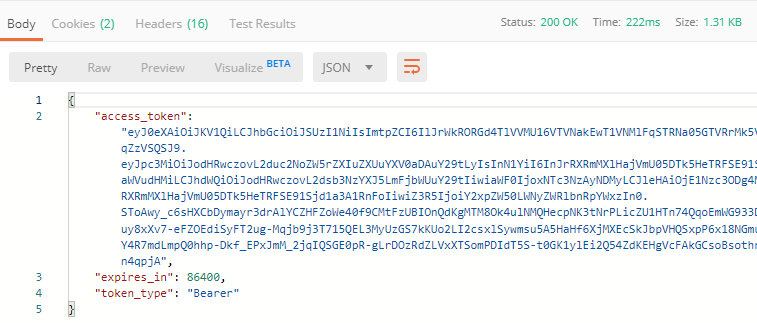

- Now we will create a POST request to the
/glossaryendpoint, to add a new item. Remember, this endpoint is protected and requires an access token. In Postman create a new request:- select type POST
- set the URL to
https://localhost:5001/api/glossary - Add a header “
Content-Type: application/json“ - Add another header “
Authorization: Bearer <token>“
where<token>is the token received in the previous call - Set the body of the request similar to the on shown below:
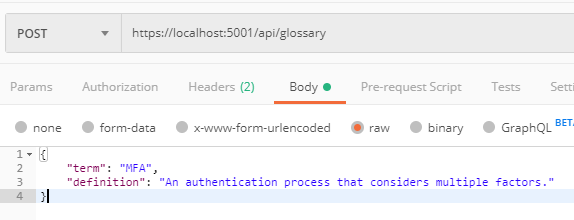

- Now click the button Send
- Observe that the request succeeds and a status code
201 (Created)is returned
- Try to create requests in Postman that test the PUT and DELETE endpoint
- Create GET requests to
/glossaryand/glossary/<term>in Postman and verify that they work without passing a token (remove the Authorization header)
Manual testing is cool, but it is not scalable and sustainable. Thus we need to be able to automate this whole process.
Integration Tests for the secured API
To mimic what we have done in our manual tests with Postman, we need to procure a token from Auth0 in an automated fashion. To do this we need access to some secrets, specifically to the client_id and client_secret of the API registered with Auth0. But we must strictly avoid to have those secrets hard coded in code or written in clear text in some configuration file that then is pushed to some code repository such as GitHub. Although the code repository may be a private one, it is still visible to way to many actors, and it is not unheard of that hackers get access to insufficiently secured repositories or accounts.
In .NET Core there exists a user secrets manager exactly for this purpose. Secrets that are needed during development time are managed by this piece of software and are never stored as part of the source code. When the application or the tests are running then those secrets can be retrieved by the code like any other configuration settings.
Let’s start by creating our secrets locally on our machine.
Creating user secret
- Open a new terminal window and navigate to the
apiproject folder:$ cd ~/glossary/api - Initialize the user secrets manager for the api project:
$ dotnet user-secrets init - Add the 4 secrets we are going to use:
$ dotnet user-secrets set "auth0:url" "<url to token provider>"
$ dotnet user-secrets set "auth0:client_id" "<client-id>"
$ dotnet user-secrets set "auth0:client_secret" "<client-secret>"
$ dotnet user-secrets set "auth0:audience" "<audience>"
where<url to token provider>equals something likehttps://<tenant>.auth0.com/oauth/token<audience>is the API audience such ashttps://glossary.acme.com. It corresponds to the identifier you chose for the API during creation
These user secrets will be stored on the local machine, but never be visible in code, nor in the code repository, as they are not part of the solution.
Creating a Test Base Class
To avoid getting a fresh token for each test via a costly remote call to Auth0 we are defining a base class that handles this for us once for every test suite.
- Add a file called
ControllerTestsBase.csto the tests project - To this file add the following code:
On line 20 to 22 we create an test HTTP client object that will be used by the tests to access the API of our microservice. Then on line 24 we retrieve a configuration object from our DI container, that will be used to retrieve configuration values later on.
Line 28 through 46 use a (real) HTTP client to access the admin API of Auth0 to procure an authentication token. On line 30 through 37 we use the config object from above to retrieve the user secrets that we defined in the previous section. On line 43 then we make the call to Auth0 which returns the token in the response. We store the token in an instance variable on line 46.
Creating Tests for secured Endpoints
Using the above base class we can now start to implement actual tests.
- To the tests project add a file called
GlossaryControllerTests.cs - To this class add the following code:
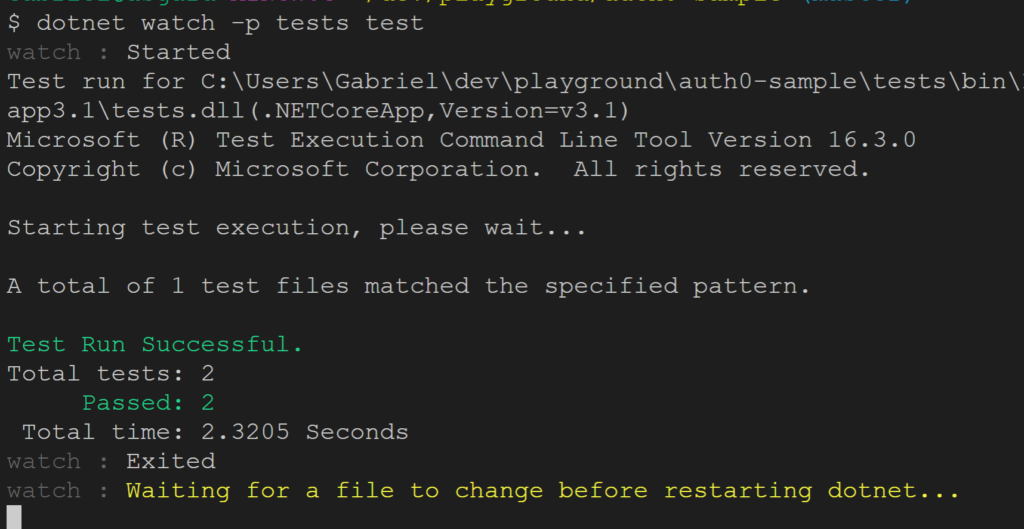
Note, this test uses the base class we defined earlier but does not require a token. You can use the following command to run the tests (and re-run them each time a change in the code is detected:$ dotnet watch -p tests test
The above test should run fine and together with the earlier test in file UnitTest1.cs the result of the test run will be:
Now we shall add a test that requires a token such as accessing the DELETE endpoint. Add the following code snippet to the test class:
On line 4 above we are adding an Authorization header with the token we retrieved from Auth0.
Also add the following three using statements to the beginning of the file:
using System.Net;
using System.Net.Http;
using System.Net.Http.Headers;
As soon as you save your changes the test runner should re-execute all tests. If everything goes as expected, this third test also succeeds, and indeed it does.
Please have a look in the sample solution where you can find additional tests for each endpoint.
Now we need to translate the same techniques to our Jasmine based outside -in tests.
Outside-in Tests for the secured API
As we have learned earlier, the important points we need to solve is to get an access token from Auth0 without leaking any secrets into our code or into the code repository. In Node JS there are many recommendations on how to handle user secrets in development. The most popular one is to create a file config/config.js which contains the secrets but is excluded from the code repository, e.g. in case of Git by adding this file to .gitignore. We also add a template file to the same folder, i.e. config/config.js.template which contains everything from config.js except the actual secret values. This file can then be used by other developers to craft their own config.js containing the actual secrets. Let’s start.
- To the
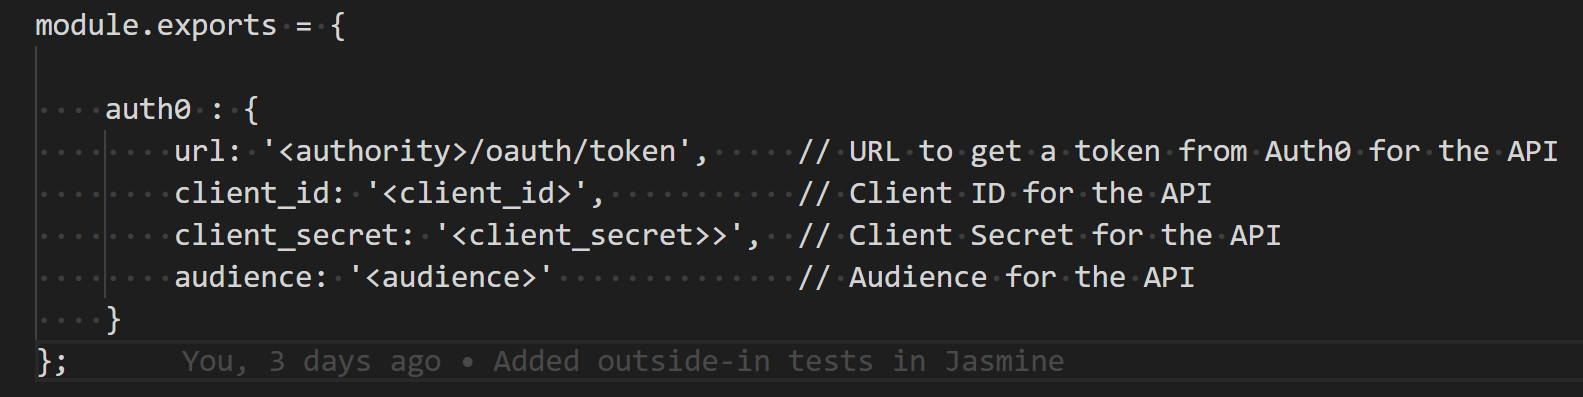
outside-in-testsproject add a fileconfig/config.js.template - To this file add the following content:

- Add another file
config/config.jsto the project with the same content - In this latter file replace the placeholders with the real secret values that you get from Auth0
- Now add a file
config/.gitignoreto the project with the contentconfig.js - We need another library in our project to access those config files. Use the following command to add the
config-jslibrary:$ npm install config-js --save - Add a file called
utils.jsto the project - To this file add the logic to retrieve the secrets from the config file and use them to request a token from Auth0:
- We need another library in our test project to help us generate UUIDs:
$ npm install uuid --save - Now update the file
glossary-spec.jsthat we added earlier with the following content:
We specifically added a beforeAll function on line 17 through 23, which is executed once for all tests in the test suite. This function uses the getToken function from the utils module we just defined. It also defines the headers we need in all request to secured endpoints.
Let’s now add a test that uses this token to access a protected endpoint. To the file add the following code snippet:
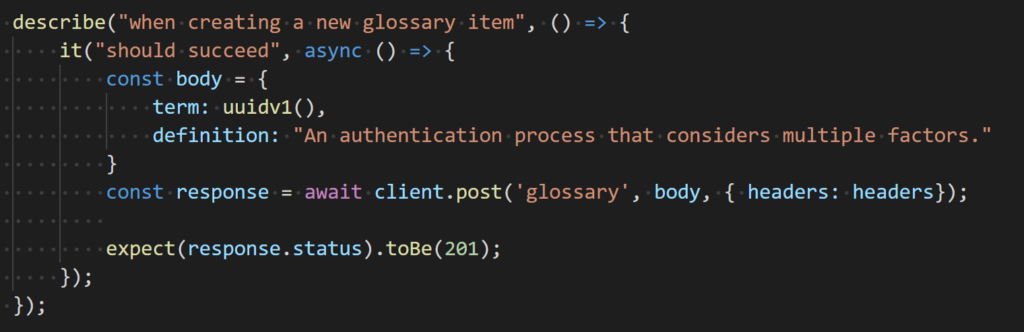
Note, to avoid problems when running tests multiple times we are using unique values generated with the help of the uuid library for the term property of the glossary item.
Run the tests with:$ npm run watch
and observe them succeed.
You can find more tests in the sample solution on GitHub.
Continuous Integration and Secrets
Eventually all tests need to run during a CI build. That means the build server also needs access to the user secrets. Usually automation or build servers such as Jenkins or TeamCity offer ways to manage secrets in a secure way. Just create a task in your pipeline which creates the user secrets for the integration tests and another one that creates the spec/spec.js file for the outside-in tests.
Conclusion
In this post I have presented ways to test a microservice with a public API that is secured using Auth0 and JWT token. We have discussed techniques on how to procure test tokens in an automated way without leaking secrets into code or into a source repository.
The code accompanying this post can be found on GitHub.
About the Author
Gabriel is the Lead Solution Architect at TechGroup. He’s a Docker and Apache Kafka expert and has many years of experience in the area of highly distributed, mission critical enterprise applications. Gabriel is the author of several books and articles, as well as of 2 video series about Docker Containers and Kubernetes and about Angular JS. In his spare time Gabriel is a passionate cook and loves to hike in the mountains and dive in the deep sea. Follow him on Twitter at @gnschenker or read his blog at https://gabrielschenker.com/index.php/blog/