

What is High ROI Testing
What exactly do we mean by high ROI testing? It’s a phrase that I use to describe a testing approach that has emerged for me after years of being brought in on projects as a consultant where there is no test coverage in an app that has low stability. These apps will frequently break when developers push code and we see developer velocity go down as the team is spending more and more time playing wack a mole on bugs. It’s also the case that these teams often like the idea of tests but are more focused on features. However, I am usually able to convince management to give me some of my sprint time for getting tests written which results in a small testing budget with high expectations. On a recent project for a large financial services company I had a 1.5 year old code base and only a few sprints to introduce stability without impacting velocity. So what’s the best way to approach this? Below we will walk through how I was able to take the financial services project from 0% code coverage to 60% with 41 tests over 3 sprints.
What are the goals of High ROI Testing
The goals are simple:
- Favor tests that test use cases
- Favor tests that don’t have to change when don’t change your requirements
- Get to an automated smoke test as quickly as possible
What’s Approach Should We Use
The approach that I’ve used successfully to accomplish the above goals is as follows:
- Smoke test your app and take notes of all the steps involved
- Write one or more test for each verifiable step
- Write tests so that they only care about the user input and API calls (or other integrations)
Can We See an Example
To fully demonstrate this technique we will need to build our way up from a simple app.
Getting the sample code
We are going to use a create-react-app based app as our starting point. If you would like to follow along then grab the code located on this Github branch: https://github.com/RyanAtViceSoftware/react-testing-best-practices/tree/step-1-create-react-app-setup.
Setting up debugging in WebStorm
NOTE: If you have no interest in using WebStorm then feel free to skip this section but in that case I’d recommend taking the time to figure out how to hit a break point in your editor of choice.
I don’t want to be pushy about editors but I use and recommend WebStorm for testing React apps because it’s easy to setup and get going. I’m sure there are other great editors out there, I just find myself spending too much time trying to configure them for testing so I use WebStorm. To setup WebStorm for testing do the following:
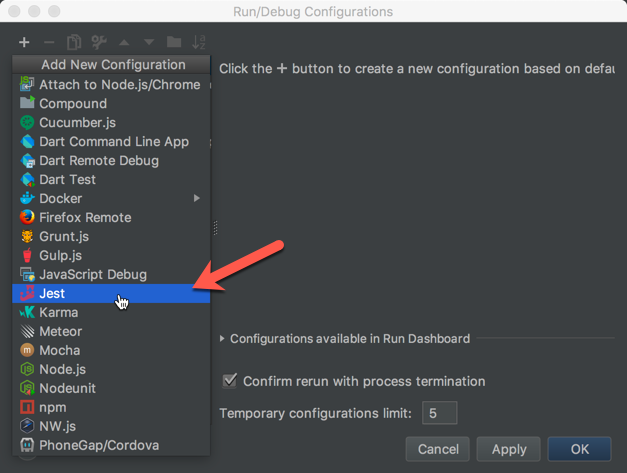
- Select
Run->Edit Configurations... - Add a new Jest configuration

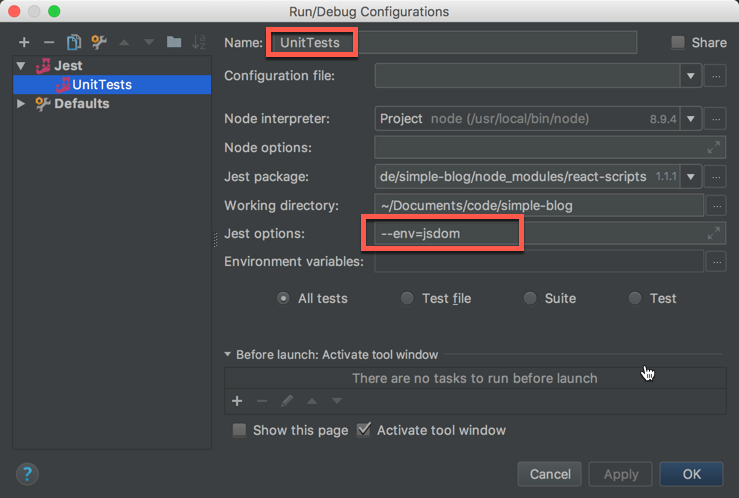
- Add the configuration highlighted below

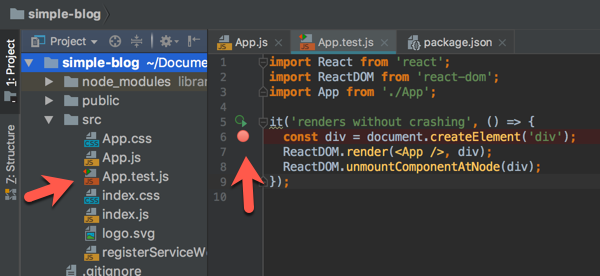
- Set a break point in App.test.js as shown below

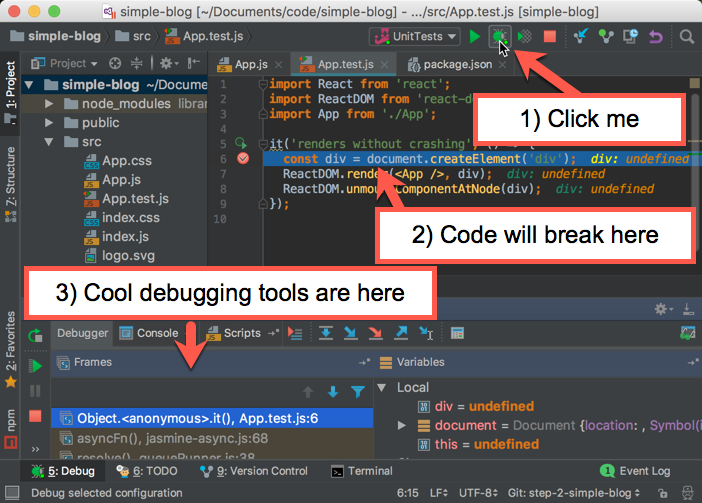
- Click the debug button with the UnitTest configuration selected as shown below and your code should break on the breakpoint we set above. Also note that you have a lot of cool debug tools at the bottom of the app for stepping, watching, etc…

Now that we have our debugging environment setup we can start writing more interesting test.
Continued in part 2: https://vicesoftware.com/react-testing-part-2/